


Rowing Machine Technique Made Simple: Your Complete Guide to Better Form and Safer Training
Rowing well is a sequence of connected movements that turns leg drive, hip extension and a braced core into smooth, repeatable power on the erg. Nail the timing and sequencing of the stroke, and you’ll generate more force, cut injury risk and get better cardio results with balanced muscle development. Many people — from club athletes to home exercisers — struggle with inconsistent technique, which limits progress and can lead to ongoing lower-back or shoulder soreness. This guide fills those gaps with clear mechanics, practical drills and progressive cues. We cover the four stroke phases with step‑by‑step corrections, then move into programming, breathing, drill design and simple setup and maintenance tips to keep both you and your machine performing well. Along the way, we’ll also explore how Terra Wellness recovery tools can be a fantastic addition to your routine, helping you train consistently and bounce back quicker after sessions.
What Are the Four Essential Phases of the Rowing Stroke?
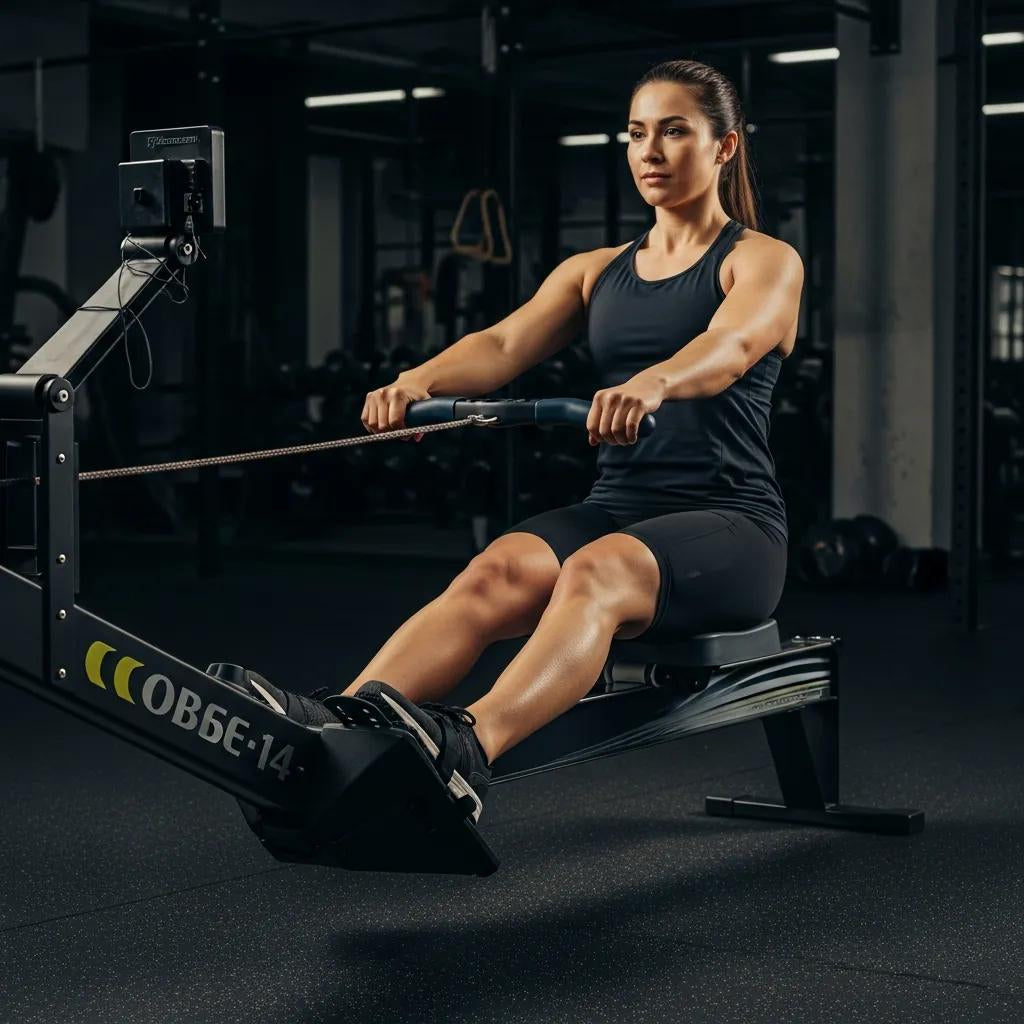
The rowing stroke repeats in four parts — Catch, Drive, Finish and Recovery — and each part has a clear job. The Catch readies the legs and aligns the torso; the Drive delivers leg power through the hips; the Finish channels that force into the handle while maintaining posture; the Recovery resets the body with controlled mobility. Knowing the sequence and simple cues for each phase cuts wasted movement and helps you row faster and safer. Use this quick reference during training to keep your technique consistent.
- Catch: Load the legs and keep a neutral spine while reaching forward to take the handle.
- Drive: Start with a powerful leg push, flow through the hips, brace the core and finish with the arms.
- Finish: Close the hips, maintain posture and hold a firm connection to the handle.
- Recovery: Move forward with controlled knee flexion and relaxed shoulders to return to the catch.
Seeing the stroke as phases makes it easier to spot where timing slips and to apply the corrective drills that follow.
How Does the Catch Phase Set the Foundation for Power?

The Catch is where you preload the legs and prepare the spine to transfer force safely. Aim for vertical (or just behind vertical) shins, hips forward but not locked, a long torso with a neutral back and a relaxed grip — this stores elastic energy in the posterior chain ready for the Drive. Common mistakes are reaching with rounded shoulders or pulling early with the arms; both waste leg power and increase the load on the lower back. Try the “front‑to‑back pause”: move slowly into the Catch, hold for two seconds, feeling a flat spine, then drive deliberately for six strokes. Short sets like this retrain the timing and the feel of a correct Catch.
With a reliable Catch, the Drive can convert that stored force into clean forward motion without compromising posture.
Why Is the Drive Phase Critical for Effective Leg Drive and Core Engagement?

The Drive produces most of your power and depends on the sequence: legs → hips → core → arms. Begin with a full leg push while keeping the torso stable so the glutes and quads drive through the pelvis; the hips then close under a braced core to transfer momentum into the handle, and the arms finish. Starting with the arms or letting the core collapse causes power leakage and raises lumbar strain. A useful corrective is “leg‑only drives,” where you keep the upper body still and push with the legs for short reps — this isolates leg force and improves the sensation of driving through the hips.
Once you can feel the proper Drive sequence, you can build drills and workouts that strengthen force transmission without over‑relying on the upper body.
| Stroke Phase | Key Action Cues | Typical Outcome / Common Mistake |
|---|---|---|
| Catch | Shins vertical, neutral spine, long reach | Loads the legs correctly; mistake: rounded back or early arm pull |
| Drive | Legs → hips → arms; brace core | Efficient power; mistake: arm‑first or hip drop |
| Finish | Strong hip closure, elbows high, firm handle | Solid transfer of force; mistake: collapsing at the hips or flicking wrists |
| Recovery | Controlled knee flexion, relaxed shoulders | Smooth reset for next stroke; mistake: rushing and losing sequence |
How Can You Perfect Your Rowing Machine Form to Avoid Injuries?
Good form spreads load away from the lumbar spine and shoulders by prioritising sequencing, posture and safe range of motion. Neutral core alignment and thoracic mobility help distribute leg drive across the trunk instead of concentrating it in the lower back. Progressive mobility work and strength steps reduce technique‑driven strains. Prevention comes down to deliberate practice: short technique sessions, regular video or mirror feedback, and staging intensity so pace and power don’t override form. Below are practical corrections for frequent faults and a quick table linking faults to causes and corrections you can use right away.
- Common errors to watch for while training: Overreaching at the catch and collapsing the chest.Pulling early with the arms, bypassing leg drive. Excessive layback places extra stress on the lumbar spine.
Apply the corrective cues consistently, and you’ll shift movement patterns away from compensation and toward safer, repeatable biomechanics.
What Are the Most Common Rowing Machine Mistakes and How Do You Fix Them?
Some faults keep showing up because they’re easy to repeat under fatigue — but each has a clear, repeatable fix. Early arm pull responds to leg‑only and legs‑and‑hips drills to rebuild sequencing. A rounded upper back at the Catch improves with thoracic mobility work and cueing an open chest with the shoulder blades set. Over‑reaching and excessive layback are corrected by limiting the finish to neutral spine and using metronome‑paced slow recoveries. A short corrective loop — record, isolate segments with drills, then extend tempo — gives quick feedback and measurable gains within weeks.
- Overgripping: Relax your hands between strokes and reset the grip on recovery.
- Knee collapse: Build single‑leg control and check foot placement on the stretcher.
- Rushed recovery: Use a 1‑2 count on the recovery to slow and control the return.
Repeated in short, focused sessions, these fixes retrain coordination and protect joints as intensity increases.
| Fault | Likely Cause | Quick Correction |
|---|---|---|
| Early arm pull | Habitual arm compensation | Do leg‑only and legs+hips drills — 4×30s |
| Rounded catch | Poor thoracic mobility or weak scapular set | 3× daily thoracic rotations and band rows |
| Excessive layback | Trying to add reach for power | Limit layback to neutral and use cadence drills |
| Overgripping | Tension and fatigue | Relax the grip and use finger pads only |
Alongside technique work, targeted recovery tools help tissues stay resilient. Short, regular use of massage tools or grounding practices can speed recovery between sessions. Terra Wellness offers a range of massage tools, grounding mats, and home saunas as recovery options to complement your mobility and progressive training. These products are designed to enhance your training, working alongside good form to help you feel your best.
What Are the Best Indoor Rowing Workout Tips to Optimise Performance?
Optimising indoor rowing blends thoughtful programming with consistent attention to technique, pacing and recovery. Start every session with a progressive warm‑up that fires the posterior chain and primes the stroke, and finish with mobility and soft‑tissue work to protect range. Structure sessions around clear goals — endurance, power or technique — so intensity matches technical ability, and form holds up under load. Below are practical tips you can apply immediately.
- Warm up progressively: light aerobic rowing, technique drills, then short power bursts.
- Prioritise technique when you’re tired: finish intervals with a controlled recovery stroke sequence.
- Use split‑time and stroke‑rate data to target pacing rather than chasing raw wattage.
Follow these consistently across a week, and you’ll build fitness without sacrificing form.
How Can Breathing Techniques Enhance Your Rowing Efficiency?
Breathing supports intra‑abdominal pressure, which stabilises the spine during the Drive and reduces shear on the lower back. A dependable pattern is inhale on the Recovery and exhale through the Drive and Finish — this lines up diaphragm movement with leg compression and core bracing. Practice timed breathing in technique sets (for example, four minutes at a controlled stroke rate with deliberate inhale/exhale cues) to build breath awareness under load. When fatigue arrives, conscious breathing helps retain posture and prevents shoulder clamping or arm overuse, keeping stroke quality consistent.
Make breath work part of warm‑ups and cool‑downs so the pattern becomes automatic during harder efforts.
Which Rowing Machine Drills Improve Power and Endurance?
Drills that isolate stroke components let you build capacity without breaking technique. Power work looks like short 10–20 stroke all‑out sets with long rest to emphasise leg drive and peak force. Endurance benefits from steady‑state rows at moderate stroke rates with short technique pauses every 4–8 minutes. Technique drills — pause‑at‑catch, pause‑at‑release, and pick drills that add segments progressively — reinforce sequencing across loads.
- Power strokes: 6×10 max efforts with 2–3 minutes rest to build force.
- Pyramid intervals: 1–2–3–2–1 minutes at target split times for pacing practice.
- Pause drills: 3×5 minutes technique work with 30s pauses at specific points in the stroke.
These progressions help you develop measurable power and aerobic capacity while locking in correct mechanics for long‑term gains.
How Does Mastering Rowing Technique Contribute to Holistic Health and Wellness?
Efficient rowing delivers physical benefits and mental clarity because it blends cardio conditioning, strength‑endurance and rhythmic, mindful movement. Physically, a balanced rowing routine improves VO2 max, evens out posterior and anterior chain strength, and gives low‑impact cardio that’s kind on joints. Mentally, the steady rhythm supports stress reduction and concentration — it’s an accessible form of active meditation that helps with rest and recovery. Pair technique work with recovery tools like soft‑tissue release, sleep aids and hydration strategies to speed adaptation and avoid burnout. At Terra Wellness, we're here to help you find calm, presence, and balance. Our thoughtful wellness choices, like grounding mats, massage tools, and hydration solutions, are designed to seamlessly fit into your mindful training workflow.
What Are the Physical and Mental Benefits of Proper Rowing Form?
Good rowing form amplifies cardio and musculoskeletal benefits while lowering injury risk, and it sharpens mental focus by linking breath, rhythm and intent. Efficient technique improves stroke economy so you do more work with less perceived effort, lifting endurance and coordination. Mentally, consistent technique training builds attentional control and lowers stress markers because body movement becomes predictable and resilient under load. Athletes who sustain clean form also report better sleep and quicker recovery — both important for steady progress and overall well-being.
These combined benefits are why technique should be the priority for anyone using rowing as a sustainable fitness habit.
How Can Rowing Integrate with Terra Wellness Products for Recovery and Energy?
Post‑session recovery works best when you combine immediate soft‑tissue release with restorative routines that replenish energy. A short self‑massage or a few minutes with a percussion tool can reduce tightness and boost circulation right after rowing. Grounding mats used during cooldown or relaxation can support parasympathetic activation. Home saunas, used sensibly after low‑to‑moderate sessions, provide passive heat that helps muscles relax. Hydration solutions and sleep aids from wellness ranges round out rehydration and overnight recovery. Terra Wellness offers a fantastic range of these items as supportive tools, designed to enhance your technique-focused training and boost your overall wellbeing.
| Recovery Tool | Practical Role | Performance Effect |
|---|---|---|
| Massage tools | Short soft‑tissue release after sessions | Speeds local recovery and improves range |
| Grounding mats | Relaxation and parasympathetic support during cooldown | Can reduce perceived stress and help with sleep onset |
| Home saunas | Passive heat therapy following low‑to‑moderate work | Improves muscle relaxation and subjective comfort |
| Hydration solutions | Replenish electrolytes and fluids | Supports faster rehydration and sustained power |
How Do You Optimise Your Rowing Machine Setup for Maximum Results?
Setting up your machine correctly makes force transfer predictable and lets you focus on technique rather than compensations. Key checks are foot placement with straps over the ball of the foot, strap tension that secures without cutting circulation, damper/resistance tuned to the session goal, and monitor positioning so split times and stroke rate are easy to read. Regular maintenance — chain lubrication and rail inspection — keeps motion smooth and consistent; neglected rowers can develop jerky resistance that forces technique changes. The checklist below highlights setup and maintenance items that affect performance and injury risk.
- Foot placement: centre the ball of the foot under the strap to direct force through the forefoot.
- Strap tension: snug to stop slippage but loose enough for full ankle motion.
- Damper setting: lower for technique/high cadence, moderate for endurance, higher for short power efforts.
Consistent setup supports consistent biomechanics, so technique gains translate into real results.
What Is the Correct Foot Placement and Equipment Adjustment?
Foot placement affects power transfer and knee tracking. Position the strap across the ball of the foot so the Drive pushes through the forefoot and avoids a heel‑first pattern. Adjust the stretcher so your knees sit at a comfortable angle at the Catch — typically around 100–115° depending on leg length — with hips forward but not compressed. Straps should be snug while allowing controlled ankle dorsiflexion during the Drive. Choose damper settings to match the session: low for high‑cadence endurance, higher for strength‑focused intervals. Quick checks before each session remove subtle compensations and help you move cleanly.
| Equipment/Setting | Recommended Setting | Effect on Performance |
|---|---|---|
| Foot placement | Strap over the ball of the foot | Better force transfer and stable knee tracking |
| Strap tension | Snug, not constricting | Prevents slippage, allows ankle mobility |
| Damper/resistance | Low (technique) → moderate (endurance) → high (power) | Shapes feel and muscle recruitment |
| Monitor feedback | Clear split and stroke‑rate display | Targets pacing and technique adjustments |
Small, repeatable setup checks before training give immediate improvements in comfort and force application.
How Does Equipment Maintenance Impact Rowing Performance?
Routine care keeps the machine behaving predictably and prevents sudden resistance changes or noise that distract and force compensations. Typical tasks include wiping rails and seat, checking chain tension, lubricating moving parts as the manufacturer recommends, and keeping monitor sensors clean and calibrated. If motion becomes stiff, the flywheel feels inconsistent, or you hear unusual noises, inspect the unit — small faults often precede performance drift and higher injury risk. A short weekly checklist preserves responsiveness so you can focus on sequencing, pacing and progressive training.
- Wipe rails and seat weekly to prevent grit buildup.
- Inspect straps and hardware monthly for fraying or looseness.
- Lubricate moving parts per manufacturer guidelines and address unusual resistance immediately.
Those simple steps keep your erg smooth and reduce the chance of hardware‑related technique breakdowns during training.